Friday 30 March 2012

Decorate your bed with cosy comfy cushions

It seems my house is slowly becoming over run with cushions these days. I'm up to 10 now in the living room now and I only have a 3 seater soft and one are chair! Thankfully my latest batch was shipped off to my sister. She asked me to make up some cushions for her bed with the left over material from her new curtains. So here are the 3 different variations I made up for her........


I bought two bolster cushion pads and just cut a rectangle shape out the same width by the circumference of the bolster along with two circles for the ends. I cut bias tape and used a thickish rope to make the edging trim. They have an invisible zip so easy to wash the cover if needed but looks slick in the meantime. 

The middle sized cushions are also edged with the same trim that I made and have a self covered button in the middle front and back for a bit of variation. 

They have an invisible seam hiding in the seam too. 

There wasn't enough fabric to make edging for the bigger cushions so I decided to use an oxford edging. Really easy to make - just stitch the outside seams right sides together, turn the right way out and now with the wrong sides together stitch all the way round (I did 3cm in but you could do more depending on how much of a flappy bit you wanted). 
 So the 'flappy bit' sort of edges it in a way. Just a bit more interesting that having no edging or border at all. 
 I put an invisible zip down the back of these ones - mostly because the fabric I had left meant there wasn't enough for another huge full square for the back. I think it works well with the oxford edging anyway. 

If some of the technical references sound a bit confusing then fear not!..... Our creative workroom workshop programme will be able to teach you all this and more when we open  our business this summer in the heart of Moseley village, Birmingham. 

Monday 26 March 2012

Knitting nightmare

I've made a mistake....a very big mistake...and I've been trying really hard to not feel down about it all weekend. I knitted a whole sleeve wrong. Not just any sleeve...a complicated one with various increases and decreases and 3 different colours. It took me a whole week to knit that sleeve and now it needs to be pulled out! Gutted -to say the least!

The sleeve is from the little jumper I'm knitting from an old pattern and its been pretty complicated.

I think I choose a bit if a difficult one for my first project using colour fair isle stylee. Its been a bit of an emotional roller coaster since I started it. I'm knitting it in 4ply when the pattern is meant to be 3ply so I had to figure out a different size of needles to use. Then I had to work out how to fair isle knit. Then there was complicated increases so I joined a knitting group and thankfully one of my new friends was able to teach me how to accommodate for the increases and use stitch markers. Then I drew a chart to help me keep track of the pattern repeat..then I realised I had colour coded it wrong and had to take out half of a pattern repeat.


I got through it though and was making good headway. I had already done the back of the jumper and I  really wanted to push on with it as there are loads of other things I want to knit and make but I'm not keen on having too many things on the go at once.
This is the back, finally finished!

But after a week of knitting for at about 2 hours every day and then stitching in all the loose ends I compared it to my other sleeve only to find it was too dam small!!! I missed out a crucial increase row after I had done the rib which would have increased the stitches to 90 from 74. So the whole bloomin' thing was knitted on 74 stitches when it should have been 90!

But hey ho....what can you do? I still really want  to finish the thing. So I'm having a rest from it for a few days and I'll just try to forget about it...put it down to experience.

Have you ever made a big mistake when knitting up something? How did you cope?

Tuesday 20 March 2012

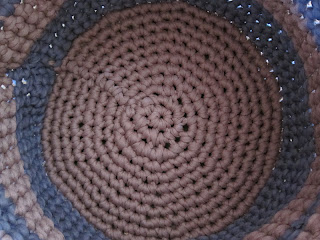
Chunky crochet basket

I left London last week with lots of inspiration and various new projects to add to my ever increasing to do list and as promised in my round up post here is my first project that can be crossed off said list. 

I bought some of this really cool up-cycled yarn that is made from the off cuts of jersey stretchy type fabrics from Hooplayarn. Its pretty thick and chunky so its really quick and easy to stitch up with a crochet hook or a pair or fat knitting needles. If your knew to crochet I'd highly recommend it as its really easy to see the stitches and work out what your doing. 

They had a really gorgeous range of muted colours but their stock varies depending on whats been getting made in the factories. I choose these colours, a dusky pink and grey-purpley one and picked up a suitably chunky size 10 crochet hook too. 


I didn't follow a specific pattern for this...just had an idea in my head of what I wanted and worked it our as I went along. It stitched up really quickly so I didn't mind taking it out a few times while I worked out how to make a flat circle - the key being in changing where you have your increases. 


I made two handles as well by missing a few stitches and doing chain instead, then carried on doing a normal round after that. 

I stripped the sides of the basked by just changing colours every few rows. 


Its the perfect size for a stash of yarn! 

Friday 16 March 2012

My 'research' trip to London

Never one to pass up an opportunity to visit the big smoke, I tagged along with the other half to London for a few days this week to get some business research done while he had to go to the office.

I think its really useful when starting a new business to see what else is going on out there and London is defiantly not short of haberdasheries, fabric stores, creative venues and generally cool funky places that have put thought and planning into their appearance, look and branding. So off I set to do some mystery shopping and some.....well.....just regular shopping too...and some amazing coffee drinking and delicious cupcake eating - it would be rude not to!

This coffee is seriously good stuff - Monmouth Coffee! Not to be missed if your in the Covent Garden area, in fact not to be missed at all - I went out my way twice to go here!  
Ahhh...the classic vanilla cupcake from the Hummingbird Bakery. I might have had a chocolate and mint one too - it was there daily special - like I said, rude not too! 

The colourful buildings on Portobello Road - gorgeous and bright in the sunshine! 

I love browsing a bit of the old stuff - I mean vintage..retro! 


So this is where all the old sewing machines go when they die - sewing machine heaven in All Saints, Notting hill. 
So other than eating, drinking and browsing, I did manage to find a few goodies to bring home. I went to the Stitch and Craft show too at the Olympia yesterday as well which was fun and picked up some things....and so my project list grows even longer (blog post to come on that next week!)


I found these gorgeous soft smooth leather off cuts....
 Which will turn into little snap frame purses with this little purse frame I also picked up. 

Ahhh...a girl can never have enough Liberty print. This will turn into a little summer top before too long. 

 I also topped up my stack of prints with this Liberty scrap pack from Ray Stitch, the plans for these little bits.....possibly some hexagon paper piecing. 

I've been looking forward to getting this Colette dress pattern for ages now and plan is to get started this weekend now that I have my fabric and buttons (both from Cloth House).

At the Stitch and Craft show I picked up two of these up cycled selvage yarns made from jersey fabric. There are pretty hefty and chunky and they will be turned into a crochet storage basket. 

 I can never pass by a bargain and these four colours of mini ric rac went together so lovely so I could't resist! 

Another bargain...7 little packets of buttons - all shapes and sizes which will be transformed into a bouquet of flowers as soon as I find some florist wire! 

So I'm going to be pretty busy this weekend then with all of this...and I've got a birthday to celebrate (not mine - the hubbys). Would love you to stay tuned for how all the projects turn out....

Wednesday 7 March 2012

Little leather note book - with a splash of liberty print

Last year I went on a fantastic weekend book binding course with the very talented travelling book binder Rachel Hazell.

It was great fun and we learned lots of different ways to make books. This is a set of little mini books I made, all bound with different stitches. 

 I also made this larger concertina book as part of the course which I filled with little drawings and paintings inspired by my favourite songs. 

Putting my skills to the test I made a simple note book for my Mum last year using some leather I had, but since then I'm sorry to say I haven't been binding any books.  

So I decided to do something about it and made up this little note book, again using leather. I also decided to brighten it up on the inside with some Liberty print. Here is how I did it.....

I used an old spiral bound note book that I had for the pages of my new book - just had to trim off the bit that was in the spiral. Then I used my lovely bone folder to crease the pages in half. 

Next I cut out my leather cover with a strip to fasten it closed. I used bonda web to line the inside cover with a Liberty print. 

I then made the holes in the pages ready for being stitched together. 


Next I punched corresponding holes in the leather cover. 

Then using some strong top stitch thread I stitched the pages and cover together, using little wooden beads on the outside to bung up with holes that I made in the leather. 

Lastly I cut a slit in the front cover for my strip to slot into and keep the note book closed and snug in my bag. 

Here is the finished book.....

...and the gorgeous Liberty print on the inside. 

Monday 5 March 2012

Up-cycled shirt patchwork quilt

As I'm sure most of you do, we have a serious hoard of old clothes that haven't ventured out the wardrobe for months, if not years, but haven't quite made it to the charity shop yet! 
I'm also sure most of you can empathise with how difficult it is to get rid of certain clothes sometimes......'it might come back into fashion again', 'I've not worn it enough times', 'its still in half decent condition', or the most common one for me is 'I just love it and can't bring myself to part ways just yet'. 

In the case of these shirts below...they had managed to make it out of the wardrobe but unfortunately  not into the bin - despite worn out holes, being ripped and generally a bit tatty. Sick fed up with an untidy pile of old clothes in the spare bedroom, I decided to do something else with the shirts instead.
 Enter the latest issue of Mollie Makes and the gorgeous quilt project by Nikki Trench from her new book 'a passion for quilting'. The idea behind the project is to gather bits and pieces of fabric you already have or something that has a special meaning, so using the shirts seemed perfect. 
As seen in Februarys' issue of Mollie Makes, the patchwork quilt project by Nikki Trench
So off I got to work cutting out my squares. I decided to make slightly smaller squares than suggested as it was easier to just cut round the grid ruler that I had already. If you've never used a rotary cutter before your missing out! Nothing gives super straight sharp lines like it! Its one of those really satisfying cuts! 


 I used 6 shirts in total and ended up with almost 160 squares! 

 Laying it all out become a bit complicated. I don't have a surface big enough in my house so had to use as much of the bed as I could then spill it onto the floor. 

 Next was stitching all those squares together. It was a bit of a slog but I got a system going and managed to get my time to stitch a strip down to about 7 minutes. It all got a bit competitive by the time I reached the 14 strip!

 And here is my finished quilt....

 ......with pockets incorporated.

 I decided to use a navy blue soft and cosy brushed cotton for the back to contrast with the light colours of the shirts. I used white quilting thread to make the squares stand out more on the back too.